Drywall Installation is generally left to the pros, but this home improvement project can be handled by a do-it-yourselfer with some tips and tricks. Use the right screw length, off-set panels so seams don’t line up and take care when working around wiring or pipes to avoid puncturing them.
When nailing, use ring-shank drywall nails. They have a larger head than other types of nails and are less likely to tear the paper surface. For professional help, contact Drywall Installation Naperville.
Before starting to hang drywall, it’s important to clear the area where you’ll be working. Remove furniture, appliances and fixtures, and cover anything that cannot be moved with tarps or plastic sheets to protect it from dust and debris generated during the installation process.
Inspect the framing to make sure it is in good condition, free of rot or damage. Check the studs and joists to ensure that they’re straight, and add blocking between them where necessary to support drywall. Also, check the locations of outlets, switches and other fixtures to mark them on the framing. This will help you hang the drywall accurately and avoid unnecessary cutting later.
Before you start hanging drywall, prepare the area by cleaning and sanding any surfaces that will be exposed. Whether you’ll be painting or adding texture, these preparations will ensure a smooth and clean surface that looks great once the drywall is installed.
Unless you’re an experienced pro, it’s best to have the right tools for the job before you begin. Drywall requires precise measurements and positioning, so you’ll want a tape measure, a utility knife, a drywall square and a drywall saw to work with. It’s also a good idea to have a drywall mud spreader, a hammer and a sanding block or sandpaper handy.
Measure each sheet of drywall to determine its width. Cut it so that it is about a quarter-inch shorter than the measurement. This will give you a little extra room to maneuver the piece when positioning it on the wall or ceiling.
When it’s time to screw each sheet, use a drywall square and a utility knife to create a straight line for your screws along the top and bottom of each piece. This will help you save time by not having to measure and cut each individual screw, and it will ensure that your screws are placed evenly throughout the entire sheet.
When you drive in each screw, be careful not to break through the gypsum paper into the core. This can weaken the integrity of the drywall, and it will also cause the screw head to tear or puncture through the paper and reduce its holding power. When screwing into each row, always ensure that the screw is set in at least a few inches so it will not come loose easily.
Hang the Sheets
Drywall installation is a project that many homeowners can do themselves without incurring the expense of a professional. It’s a relatively simple task if you follow a few best practices. These tips will help you hang drywall like a pro and make the finishing stages much easier.
Start by wearing safety goggles, a dust mask and work gloves. Before installing your first sheet, mark the location of your cut with a T-square or other straight edge. Then score the front side of the wallboard with a utility knife, making your score fairly deep–at least 1/8″ (Image 1). Apply pressure to the drywall and it should snap along that line. Repeat with the remaining sheets of drywall, scoring and snapping as necessary. When you’re ready to install the next section, apply construction adhesive to the studs and joists before hanging your next sheet (Image 2). This step isn’t strictly required but it can help maintain flat walls over time.
The direction that you hang your drywall will play an important role in the quality of your finished product. Commercial jobs often require that the walls and ceilings be hung vertically, while residential projects can be hung horizontally. Choosing the right option will reduce the number of noticeable seams and add strength to the walls.
When you’re installing drywall, always sit the end of each board halfway over a stud. This ensures that the drywall will be properly supported and may even prevent cracks down the seams. It’s also a good idea to fasten each piece of drywall with five screws in a single row, evenly spaced across the face and into the joist or strapping member underneath. Always be careful not to screw too close to the edges of the drywall, as this can puncture through the paper and damage the core.
If you’re installing a light, outlet or door, be sure to account for them as you hang the drywall. Use a drywall saw to cut the openings, or use a spiral bit on a power drill to cut around them (Image).
As you complete each row, be sure to double-check that you’re accounting for windows, doors and other obstructions. This will avoid unsightly gaps that can’t be covered by baseboard trim when you finish the room.
Finishing the Walls
Drywall is a versatile building material that has replaced lath and plaster as the standard for walls and ceilings. It’s relatively inexpensive and DIY friendly. However, to create smooth walls and ceilings that are ready for paint or wallpaper, you need to do a bit of extra work. The best way to minimize the number of steps is to follow an orderly process and take your time.
Start by inspecting the space. Make sure you have enough space to maneuver in the room and check that electrical wires, plumbing, and vents won’t interfere with your drywall installation. Also, confirm that studs and joists are straight and aligned. If not, add blocking between joists. Finally, mark the locations of light switches, outlets, and fixtures on the studs to help you hang them correctly.
When you are ready to begin hanging drywall, set up your drywall lift or recruit a buddy to help you. It’s difficult to safely hoist a sheet by yourself and it will take more time to hang each piece. When you’re finished with one whole sheet, move on to the next before returning to the previous wallboards.
If you are hanging drywall to replace existing wallboards, use a full-length sheet to reduce the number of seams. Otherwise, you will have to seam two smaller panels together.
Once you have hung all of the drywall, drag a drywall taping knife across each joint to detect protruding nails or screws. Then tighten or reposition them to avoid future problems with nail-pops or loose joints.
For perimeter seams, apply a thin bed of compound with a 6-inch drywall taping knife. Press paper tape immediately into the mud, centering it over the joint. Apply a second coat of compound over the tape, using the same method. When this is dry, lightly sand the surface of the taped joint with a handheld pole sander.
For inside corners, you can use a corner tool for both outside and inside corners. This will create a cleaner, professional finish than simply applying compound by hand. Alternatively, you can use a drywall blade for corner bead and use a hand or utility knife to scrape off any excess.
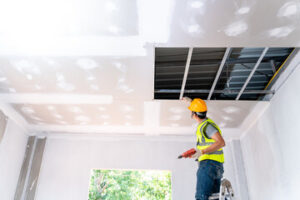
Finishing the Ceiling
Before drywall became popular, interior walls and ceilings were created by placing plaster over wooden strips (called laths). Drywall requires less labor to install, but it still takes time for installation, curing, and finishing. Once completed, the drywall process moves your construction project from looking like a building site to a functional, livable space. Local regulations may dictate if you need a permit for your drywall replacement and installation.
As with the walls, begin your ceiling by prenailing and positioning the first sheet. As you work, mark the location of all studs with your stud finder. Be sure to offset the end joints of each row from those of the previous row by at least four feet. Also, use your stud finder to verify that the studs are on 16″ or 24″ centers. You can expect to run into some studs that aren’t on center, due to poor carpentry or previous drywall installs.
Once you’ve hung the first row, cut a full sheet of wallboard lengthwise to fill in any open spaces at the end of your run. Be sure to mate the finished edge with the opened edge of the last full row. Doing this eliminates the need for trimming and makes a stronger seam.
Repeat the process to hang the remaining sheets of drywall. When you reach the ends of your run, hang a single panel over any outlet and switch boxes. If the box is large enough, place the drywall over it. If not, you can shave down the drywall over the boxes with a utility knife, to avoid having to trim it later.
Before installing each new panel, check the drywall for levelness using a level and a tape measure. If the drywall isn’t level, it will take longer to complete the mudding and taping stages and may affect the quality of your finished paint job.
Once you’ve finished hanging all the drywall panels, use a tool called a screw gun to drive a line of five evenly-spaced screws through each panel and into the joists below it. Be sure to follow your stud marks, double-checking that each screw is deep enough to prevent pulling the drywall apart from its framing components.